CreaseManager
Part I - Installation
Extract the scCreaseManager folder from the scCreaseManager.zip.
Inside the scCreaseManager folder, find two subfolders: macOSX_linux and Windows. Each subfolder contains additional subfolders for each Maya version, each with a scCreaseManager.* file. Copy the scCreaseManager.* file to the following path.
Windows
\Users\USERNAME\Documents\maya\MAYAVERSION\scripts
Linux
$HOME/maya/MAYAVERSION/scripts
/Users/USERNAME/Library/Preferences/Autodesk/maya/MAYAVERSION/scripts
Launch / Restart Maya.
In Maya, open a Python Tab in the Script Editor and execute:
To create a button for opening CreaseManager from the shelf, select the code you just pasted, go to File > Save Script to Shelf… in the Script Editor.
Once the CreaseManager button is added to the shelf, it will initially display a default icon. To customize this, you will use the icon file provided.
Right-click the new CreaseManager button on the shelf. This will open a context menu.
From the context menu, select ‘Edit…’. This will open a new window called ‘Edit Shelf Button’.
In the ‘Edit Shelf Button’ window, under the ‘Shelves’ tab, you will see an option for ‘Icon Name’. This is where you will input the path of your icon file.
Click the folder icon next to the ‘Icon Name’ field. This will open a file browser.
In the file browser, navigate to the location where you saved the provided icon image, select the file, and click ‘Open’. This will set your image as the icon for the CreaseManager button.
Click ‘OK’ to close the ‘Edit Shelf Button’ window.
Your new icon should now be displayed on the CreaseManager button on the shelf. If your new icon does not appear immediately, you may need to restart Maya for the changes to take effect.
Enjoy using CreaseManager!
Internet connection needed for license validation:
For uninterrupted use of this tool, maintain a consistent internet connection. This is essential for license activation, validation, and periodic authenticity checks.
Part II - UI Explained
Operations
If Load Mesh Default Creases is checked, the Load Crease button will bring automatically the correspondent Crease data, in case the selected mesh has an extra attribute pointing to the proper data (MeshManager tool needed).
Toggle Creasing Visibility enables/disables Maya’s creasing visibility on your selected polygonal mesh.
‘Help‘
‘Help‘ gives you access to the CreaseManager documentation site.
‘About CreaseManager‘ provides a version and detailed information about this tool.
Use Creasing
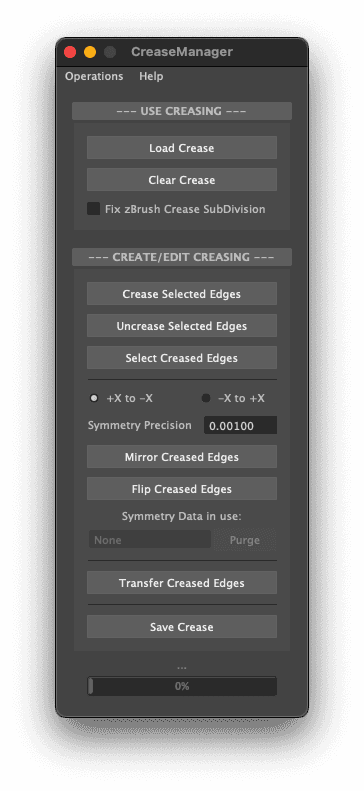
In this section, you manipulate existing creasing data in order to bring it back to your current model or to prepare your model to be sent to ZBrush.
Load Creasing allows you to load a *.json file where the creasing data was previously saved. The tool automatically loads the file from the current project file directory. In order to work, a poly mesh must be selected.
Clear Creasing clears all the creased edges from any selected poly mesh.
If Fix zBrush Crease SubDivision is checked, the artifact on the mesh introduced after zBrush subdivision will be fixed.

Edit Creasing
In this section, you create/edit existing or nonexisting creases.
Crease Selected Edges creases the currently selected edges. It only works with one polygonal mesh at a time, even if you have multiple meshes selected.
Uncrease Selected Edges remove creases on the currently selected edges. It only works with one polygonal mesh at a time, even if you have multiple meshes selected.
Select Creased Edges selects all the creased edges, if any, of your currently selected polygonal mesh. It only works with one polygonal mesh at a time, even if you have multiple meshes selected.
+X to -X / -X to +X determines the direction of the mirror behavior, using as reference positive or negative X. Notice that this is object space dependant and not global space.
Symmetry Precision determines the mirror tolerance in case your poly mesh verts are not 100% symmetrical.
Mirror Creased Edges apply the same crease sets from one side of the poly mesh to the other. In order to operate the mirror, the tool will consider the mirror direction and the Mirror Global Precision previously set. In order to work, a poly mesh must be selected.
Symmetry Data in use in order to expedite the mirror computation, this tool can temporally generate, import, or export symmetry data from the mesh being used. If the text field is empty or ‘None’ is displayed, means that there is not any symmetry data in memory. After performing a mirror operation, the name of the mirrored mesh will appear on the text field, and this symmetrical data will be used in future operations.
Purge removes from memory any stored symmetrical data.
Save Crease saves the crease data into a *.json file. The tool automatically saves the file in the current project file directory. In order to work, a poly mesh must be selected.
The bottom of the LandmarkManager features a progress bar that displays the details and progress of any ongoing operation.