MeshManager
Part I - Installation
Extract the scMeshManager folder from the scMeshManager.zip file.
Inside the scMeshManager folder, in the scripts folder, find the appropriate subfolders according to your Maya version: '2020_and_below' or '2022_and_newer'. Each subfolder contains the scMeshManager appropriate file, scMeshManager.pyc or scMeshManager.py, depending or the license type purchased. Copy the appropriate scMeshManager.* file to the following path:
Windows
Linux
Mac
On Mac, the User Library folder is hidden by default, but you can access it by following these steps:
Open a new Finder window.
From the Finder menu bar, select the Go drop-down menu.
Select Go to Folder… from the drop-down menu.
Type the following path and then click Go.
Launch / Restart Maya.
In Maya, open a Python Tab in the Script Editor and execute:
To create a button for opening MeshManager from the shelf, select the code you just pasted, go to File > Save Script to Shelf… in the Script Editor.
Once the MeshManager button is added to the shelf, it will initially display a default icon. To customize this, you will use the icon file provided.
Right-click the new MeshManager button on the shelf. This will open a context menu.
From the context menu, select ‘Edit…’. This will open a new window called ‘Edit Shelf Button’.
In the ‘Edit Shelf Button’ window, under the ‘Shelves’ tab, you will see an option for ‘Icon Name’. This is where you will input the path of your icon file.
Click the folder icon next to the ‘Icon Name’ field. This will open a file browser.
In the file browser, navigate to the location where you saved the provided icon image, select the file, and click ‘Open’. This will set your image as the icon for the MeshManager button.
Click ‘OK’ to close the ‘Edit Shelf Button’ window.
Your new icon should now be displayed on the MeshManager button on the shelf. If your new icon does not appear immediately, you may need to restart Maya for the changes to take effect.
Enjoy using MeshManager!
Part II - UI Explained
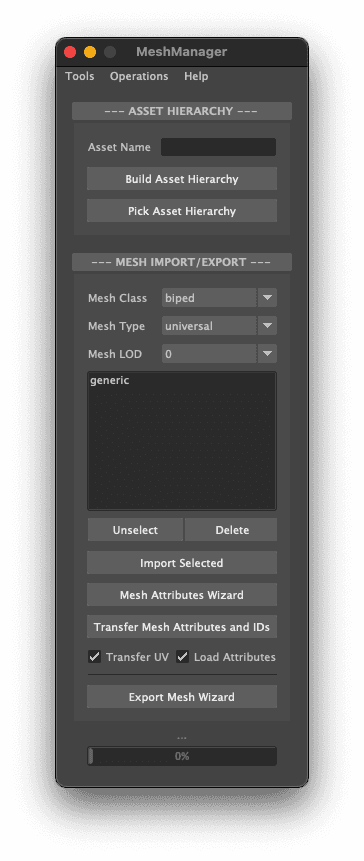
Main UI
Tools
LandmarkManager opens LandmarkManager tool if installed.
CreaseManager opens CreaseManager tool if installed.
UV Set Editor opens Maya’s UV Set Editor.
Preferences…
Set Data Folder… Lets you set the folder where all associated mesh data will be stored. If nothing is set here, the tool will use Maya’s default project folder or the one currently in use by Maya.
Set Asset Hierarchy… Lets you set the *.json file with the hierarchical structure that will be reproduced with the Build Asset Hierarchy button. By default, it opens the defaultHierarchy.json that comes default with the tool.
Store Current Import Mesh Filters stores the current values of Mesh Class, Mesh Type, and Mesh LOD, so the next time you open the tool, it will remember the current values.
Operations
If Load associated mesh data at Import is checked, the tool will load all the mesh-associated data when the mesh is imported into the Maya scene using the ‘Import Selected’ button on the ‘Mesh Import/Export’ area. If unchecked, only data paths will be added into the mesh, as extra attributes on its transform node.
Generate and Export Symmetry Data calculates and saves currently selected mesh Symmetry Data as a *.json file on the proper path. In order to work, a poly mesh must be selected.
Mirror Mesh…
+X to -X / -X to +X determines the direction of the mirror behavior, using as reference positive or negative X. Notice that this is object space dependant and not world space. In order to work, a poly mesh must be selected.
Flip Mesh flips currently selected mesh shape. In order to work, a poly mesh must be selected.
OneClick Transfer Vertex Order transfers vertex ID from sourced (first selected mesh) to target (second selected mesh). No anchor points selection from source or target is required.
Quick Start: Biped – Universal – LOD 0 – Generic imports all the generic meshes that are the base elements for a generic biped at LOD 0. All elements will be placed properly in the defined asset hierarchy.
Quick Start: Biped – Universal – LOD 1 – Generic imports all the generic meshes that are the base elements for a generic biped at LOD 1. All elements will be placed properly in the defined asset hierarchy.
Help
Help gives you access to the MeshManager documentation site.
About MeshManager provides a version and detailed information about this tool.
Asset Hierarchy
In this section, you assign or pick an asset name, and create its hierarchy.
Asset Name is the name of the asset to be created or picked from the scene.
Build Asset Hierarchy builds the asset hierarchy whose name is defined by the above text field, and which structure is defined at ‘Tools/Preferences…/Set Asset Hierarchy…’
Pick Asset Hierarchy just gets the name of any selected object and adds it to the ‘Asset Name’ text field.

Mesh Import/Export
In this section, you import/export meshes with their associated data.
Mesh Class option menu to navigate between the different mesh classes available, previously exported and categorized by the MeshManager tool.
Mesh Type option menu to navigate between the different mesh types available, previously exported and categorized by the MeshManager tool.
Mesh LOD option menu to navigate between the different mesh LOD (Level Of Detail) available, previously exported and categorized by the MeshManager tool.
Mesh List list of all meshes available sorted by their class, type, and LOD.
Unselect unselects any selected mesh listed on ‘Mesh List’.
Delete deletes any selected mesh listed on ‘Mesh List’. Notice that this operation will delete the mesh, but not its associated data, since this data might be used by other meshes.
Import Selected imports any selected mesh listed on ‘Mesh List’. Notice that the handling of the associated data is dependent on what is checked on ‘Operations/Load associated mesh data at Import’.
Mesh Attribute Wizard opens the ‘Mesh Attribute Wizard’.
Transfer Mesh Attributes and IDs transfers mesh-associated data from the mesh selected on ‘Mesh List’ to any selected mesh on the scene.
If Transfer UV is checked, UV data will be transferred with ‘Transfer Mesh Attributes and IDs’.
If Load Attributes is checked, the tool will load all the mesh-associated data when the mesh gets the data transferred. If unchecked, only data paths will be added into the mesh, as extra attributes on its transform node.
Export Mesh Wizard opens the ‘Export Mesh Wizard’.
Custom GoZ Sends to zBrush two copies of the same mesh, the first one with landmark UV set in use, and the second one with visdev UV set on.
The bottom of the MeshManager has a progress bar that indicates the details and progress of any running operation.
Mesh Attribute Wizard UI
Mesh Attribute Wizard opens this window, from where all the associated data from the meshes selected on the ‘Mesh List’ (landmarks, crease, symmetry, topology & UV sets) can be reassigned. This wizard works with one or more selections from the ‘Mesh List’.

Save Mesh Attributes saves any reassign made on all of the meshes listed.
Export Mesh Wizard UI
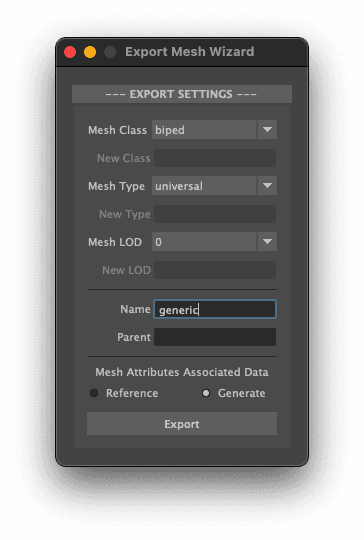
Export Mesh Wizard opens this window, from where all the associated data for the mesh to be exported is set.

‘Mesh Class’ option menu to navigate between the different mesh classes available, previously exported. If custom is selected, the ‘New Class’ text field will be enabled in order to create a new class.
New Class is the name of the new class to be created.
Mesh Type option menu to navigate between the different mesh types available, previously exported. If custom is selected, the ‘New Type’ text field will be enabled in order to create a new type.
New Type is the name of the new type to be created.
Mesh LOD option menu to navigate between the different mesh LOD available, previously exported. If custom is selected, the ‘New LOD’ text field will be enabled in order to create a new LOD.
New LOD is the name of the new LOD to be created.
Name is the name with which the mesh to export will be cataloged.
Parent is the name of the parent under which the mesh to export will be when comes the time to import the mesh into the scene.
Mesh Attributes Associated Data
Reference references all the mesh’s associated data (landmarks, crease, symmetry, topology & UV sets).
Generate generates and associates all the mesh’s associated data (landmarks, crease, symmetry, topology & UV sets).
Export exports the selected mesh on the Maya scene.